Pada tutorial ini kita akan membahas tentang konfigurasi modul Rewrite pada service Apache Ubuntu Server 20.04
Modul Rewrite adalah sebuah modul pada service Apache yang berfungsi untuk memanipulasi sebuah URL pada webserver. Sederhananya, modul Rewrite ini akan menyesuaikan url pada sebuah website, agar url yang digunakan terlihat rapi, bersih dan SEO friendly.
Secara default, Apache tidak secara otomatis mengaktifkan modul ini, jadi disini kita akan melakukan beberapa konfigurasi agar modul rewrite ini bisa kita gunakan.
Implementasi dari modul rewrite ini akan berbentuk file .htaccess yang biasanya ada didalam folder sebuah website. File .htaccess sendiri akan berisikan script rule sederhana yang disesuaikan pada framework atau bahasa yang digunakan pada proses pembangunan website tersebut. Pada tutorial ini, kita akan melakukan konfigurasi modul rewrite pada apache web server yang berisikan website yang dibuat dengan framework Codeigniter 4.
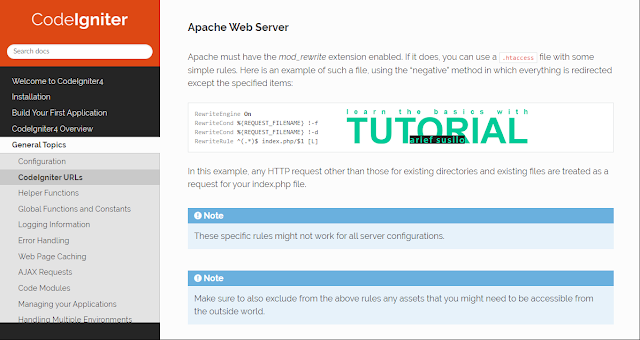
Kalian bisa buka dokumentasi dari framework yang kalian gunakan dan cari bagian setup apache web server. Dibawah ini adalah dokumentasi dari framework Codeigniter 4, terlihat pada bagian Apache Web Server dijelaskan bagaimana cara untuk menggunakan mod_rewrite menggunakan simple rule. Pada konfigurasi ini, kita akan menggunakan script .htaccess versi lengkapnya.
Kita mulai proses konfigurasi modul rewrite ini.
1. Aktifkan Modul Rewrite
Untuk mengaktifkan modul rewrite, gunakan perintah :
sudo a2enmod rewrite
Selanjutnya, restart service apache menggunakan perintah :
sudo systemctl restart apache2
2. Konfigurasi site-enable Apache
Selanjutnya, kita perlu melakukan konfigurasi pada site-enable Apache agar bisa melakukan fungsi URL rewrite yang nantinya akan di jalankan oleh file .htaccess.
Ketikan perintah :
sudo nano /etc/apache2/sites-enabled/000-default.conf
Output
<VirtualHost *:80>
# The ServerName directive sets the request scheme, hostname and port that
# the server uses to identify itself. This is used when creating
# redirection URLs. In the context of virtual hosts, the ServerName
# specifies what hostname must appear in the request's Host: header to
# match this virtual host. For the default virtual host (this file) this
# value is not decisive as it is used as a last resort host regardless.
# However, you must set it for any further virtual host explicitly.
#ServerName www.example.com
ServerAdmin webmaster@localhost
DocumentRoot /var/www/html
# Available loglevels: trace8, ..., trace1, debug, info, notice, warn,
# error, crit, alert, emerg.
# It is also possible to configure the loglevel for particular
# modules, e.g.
#LogLevel info ssl:warn
ErrorLog ${APACHE_LOG_DIR}/error.log
CustomLog ${APACHE_LOG_DIR}/access.log combined
# For most configuration files from conf-available/, which are
# enabled or disabled at a global level, it is possible to
# include a line for only one particular virtual host. For example the
# following line enables the CGI configuration for this host only
# after it has been globally disabled with "a2disconf".
#Include conf-available/serve-cgi-bin.conf
</VirtualHost>
Di dalam file konfigurasi diatas, tambahkan script dibawah ini setelah string <VirtualHost *:80> :
<Directory /var/www/html>
Options Indexes FollowSymLinks MultiViews
AllowOverride All
Order allow, deny
Allow from All
</Directory>
Options Indexes FollowSymLinks MultiViews
AllowOverride All
Order allow, deny
Allow from All
</Directory>
Kemudian save pengaturan konfigurasi yang sudah kita setting. Tekan CTRL+X untuk melakukan penyimpanan konfigurasi, lalu konfirmasi dengan mengetik Y, lalu terakhir tekan Enter untuk kembali ke terminal utama server. Selanjutnya kita lakukan restart kembali pada service Apache.
Baca juga :
How To Install Ubuntu Server 20.04 On Virtual Box
Konfigurasi Dasar Pada Ubuntu Server 20.04
Konfigurasi SSH Key Pada Ubuntu Server 20.04
Konfigurasi LAMP Server Pada Ubuntu Server 20.04
3. File .htaccess
Selanjutnya, kita buat file .htaccess, kalian bisa langsung membuat file .htaccess ini didalam folder website atau project kalian. Disini kita akan membuat file .htaccess pada directory html, diluar folder website atau project, untuk membuat file .htaccess gunakan perintah :
sudo nano /var/www/html/.htaccess
Lalu kita buat rule mod_rewrite dengan mengetikan script dibawah ini :
<IfModule mod_rewrite.c>
RewriteEngine On
RewriteBase /
RewriteCond %{REQUEST_URI} ^system.*
RewriteRule ^(.*)$ /index.php?/$1 [L]
RewriteCond %{REQUEST_URI} ^application.*
RewriteRule ^(.*)$ /index.php?/$1 [L]
RewriteCond %{REQUEST_FILENAME} !-f
RewriteCond %{REQUEST_FILENAME} !-d
RewriteRule ^(.*)$ index.php?/$1 [L]
</IfModule>
<IfModule !mod_rewrite.c>
ErrorDocument 404 /index.php
</IfModule>
Setelah script diatas sudah diketikan, kita save konfigurasinya, tekan CTRL+X untuk melakukan penyimpanan konfigurasi, lalu konfirmasi dengan mengetik Y, lalu terakhir tekan Enter untuk kembali ke terminal utama server.
Setelah itu kalian bisa pindahkan file .htaccess ke dalam folder website atau project kalian.
Kesimpulan :
Dengan mengaktifkan mod_rewrite ini, kita dapat meningkatkan keamanan website sekaligus merapihkan URL website agar terlihat rapi, bersih dan SEO friendly.
Sebagai perbandingan, berikut adalah contoh URL website yang belum menggunakan modul rewrite :
https://website.com/posts.php?year=2022&month=05&day=09&title=mod-rewrite-apache
Sedangkan, dibawah ini adalah contoh URL website yang sudah menggunakan modul rewrite :
https://website.com/2022/05/09/mod-rewrite-apache
Sekian untuk tutorial cara melakukan konfigurasi modul rewrite pada Ubuntu Server 20.04, semoga ilmu yang kalian dapat dari tutorial ini bisa bermanfaat untuk kalian semua. Terima kasih.


0 comments: